Curing Italian salami at home is like embarking on a culinary adventure, akin to training for a marathon—it requires patience, precision, and a bit of courage. Picture this: a few years back, I decided to impress my friends with homemade salami. I thought, "How hard could it be?" Famous last words, right? Fast forward to a kitchen filled with the aroma of freshly ground pork, a countertop cluttered with spices, and me, armed with a meat grinder, feeling like a cross between a mad scientist and a gourmet chef. The result? A salami that was not only edible but actually delicious. And now, I'm here to share my hard-earned wisdom on how to cure Italian salami at home safely.
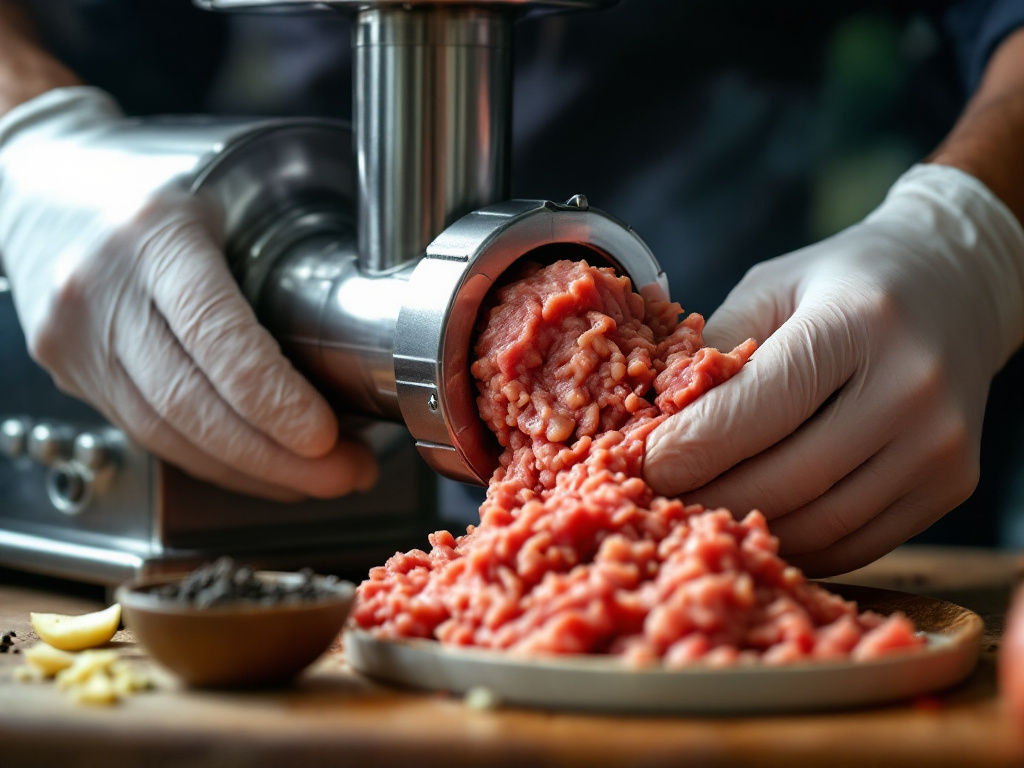 A close-up of a person's hands carefully grinding fresh pork meat using a high-quality meat grinder, with visible spices like black pepper and garlic nearby.
Gathering Your Ingredients and Supplies
Before diving into the exciting world of curing Italian salami, it's essential to gather all the necessary ingredients and supplies. This step ensures that you have everything at your fingertips when you start your curing process. Not only does it make the experience smoother, but it also helps you stay organized, which is crucial for maintaining safety and quality when learning how to cure Italian salami at home safely.
Pro Insider Secrets
First and foremost, you'll need fresh pork meat, which is the foundation of your salami. Look for a good quality pork shoulder or a blend of pork shoulder and fatback to create that perfect balance of flavor and texture. Along with the meat, you will require various spices and flavoring agents such as black pepper, garlic, and white wine. Don't forget the curing salt, which is essential for preventing harmful bacteria growth and ensuring a safe fermentation process.
In addition to your ingredients, you will need specific supplies to make the curing process easier and more efficient. A high-quality meat grinder will help you achieve the right texture for your salami. You will also need a sausage stuffer for shaping your salami, along with casings made from natural ingredients that allow the meat to breathe during the curing process. A digital scale is also handy for measuring ingredients precisely, which is crucial when learning how to cure Italian salami at home safely.
Lastly, consider investing in a temperature and humidity gauge if you plan to cure your salami in a controlled environment. Proper conditions are vital for achieving that authentic Italian flavor and texture while ensuring safety during the curing process. With your ingredients and supplies assembled, you're ready to embark on the delicious journey of making your own salami at home!
Preparing the Meat Mixture
Using a meat grinder, pass the mixture through the coarse plate first. This will create a rough texture that is desirable for salami. After you've ground the meat, it's recommended to chill it for a while to keep the fat from smearing during the blending process. Chilled meat mixes better, and it helps ensure your salami maintains the right consistency as you prepare it for curing.
Next, it's time to mix in the seasonings and curing agents. Common spices for Italian salami include garlic, black pepper, and crushed red pepper flakes, along with curing salt, which is critical for the preservation process. Make sure to follow the recommended measurements precisely to avoid any issues. Mix the spices thoroughly with the meat until evenly combined. This step is vital for flavoring and safety while learning how to cure Italian salami at home safely.
Once your mixture is well combined, it's essential to test the flavor and seasoning. Take a small portion and fry it in a pan to taste. Adjust the spices if needed, ensuring you're satisfied with the flavor before proceeding. After this final adjustment, your meat mixture is ready for stuffing into casings, taking you one step closer to creating your homemade Italian salami!
Stuffing the Casings Properly
Once your casings are ready, it's time to prepare your meat mixture. Make sure your ground meat is well-seasoned and mixed thoroughly to distribute all the flavors evenly. Using a sausage stuffer or a funnel, carefully fill the casings with the meat mixture. As you fill, make sure to pack it tightly to avoid air pockets, which can lead to spoilage. Use a wooden dowel or a similar tool to push the mixture down as you go. This part is essential when learning how to cure Italian salami at home safely.

An important step: stuffing the casings properly.
As you reach the end of each casing, tie off the openings securely with butcher twine. It's a good idea to twist the salami at intervals to create individual links, which makes it easier to handle during the curing process. Be gentle and avoid overstuffing, as this can cause the casings to burst during fermentation or drying. A well-stuffed casing is key to achieving that perfect bite and ensuring delicious, homemade Italian salami.
Finally, take a moment to inspect your stuffed salami. Look for any signs of air pockets or uneven stuffing, and gently squeeze out any trapped air before sealing the ends. Properly stuffed casings not only enhance the visual appeal of your salami but also ensure even fermentation and drying, which are essential when learning how to cure Italian salami at home safely. With practice, you'll become skilled in this technique, making your homemade salami an absolute delight.
Monitoring the Curing Process
During the curing period, which typically lasts from a few weeks to a couple of months, inspect your salami regularly. Look for any changes in color or texture. A healthy salami should gradually dry and develop a firm texture. If you notice excessive mold growth, that could indicate high humidity levels, which is something you must control. Remember, some white mold is normal and beneficial for the aging process, but green or black mold should be cleaned off immediately.
 Controling the weight and humidity while curing salami at home.
Another important factor to monitor is the weight of the salami. As it cures, it will lose moisture and weight. Aim for a weight loss of about 30% to 40% during the curing process. This loss indicates that the salami is adequately drying and reaching the right balance of flavor and texture. Documenting these changes can help you understand how to cure Italian salami at home safely and improve your technique with each batch.
Finally, keep notes on your observations and any adjustments you make along the way. This not only enhances your curing skills but also helps in troubleshooting any issues that may arise. With patience and careful monitoring, you can master the art of curing salami and enjoy delicious homemade Italian salami that is both safe and flavorful.
Funny Story Time!
Imagine this: it's my first attempt at curing salami, and I'm feeling like a culinary genius. I've got my meat grinder humming, spices flying, and casings ready to be stuffed. Everything is going smoothly until I realize I've overstuffed the casings. Picture a salami bursting at the seams, looking more like a sausage explosion than a gourmet delight. I'm frantically trying to salvage the situation, squeezing out air pockets, and tying off ends like a mad scientist. Lesson learned: patience and precision are key when stuffing those casings!
And then there's the tasting part. I dramatically slice into my first homemade salami, expecting a symphony of flavors. Instead, I'm met with a mouthful of overly salted, slightly under-seasoned meat. My face contorts in a mix of surprise and disappointment, but I can't help but laugh at the absurdity of it all. Curing salami is a journey, and every batch is a step closer to perfection.
Conclusion
Curing Italian salami at home is a rewarding adventure that combines art, science, and a whole lot of patience. By gathering the right ingredients and supplies, preparing your meat mixture with care, stuffing the casings properly, and monitoring the curing process closely, you can create a salami that rivals any store-bought variety. So, roll up your sleeves, embrace the journey, and enjoy the delicious results of your labor. Happy curing!
Myth-Busting Corner: The Truth About Curing Italian Salami Safely
Myth: Curing salami at home is too risky and complicated.
Reality: With the right ingredients, tools, and careful monitoring, curing salami at home can be safe and rewarding.
What This Means for You: You can enjoy homemade salami with confidence, knowing that you've taken all the necessary precautions.
Behind-the-Scenes: The Curing Italian Salami Safely Secrets Pros Don't Want You to Know
Insider tip from a 20-year industry veteran: The key to a perfectly cured salami is consistent humidity and temperature control. Invest in a good quality humidity and temperature gauge to ensure optimal conditions throughout the curing process.
Unexpected backstory that changes everything: Did you know that the traditional method of curing salami involves using natural casings made from animal intestines? These casings allow the meat to breathe, enhancing the flavor and texture of the final product.
How this insight can transform your approach: By understanding the importance of natural casings and precise environmental control, you can elevate your homemade salami to a new level of quality and flavor.
References
- USDA Food Safety and Inspection Service - A comprehensive guide on curing meat safely, including tips on ingredients, equipment, and best practices.
- The Spruce Eats - A detailed article on making salami at home, covering everything from ingredient selection to curing techniques.
- Serious Eats - An in-depth look at the art of salami making, with expert tips and step-by-step instructions.
- Food Network - A recipe for homemade salami, including insights on flavoring and curing.
- Amazing Ribs - A guide to curing salami and sausage safely, with a focus on food safety and best practices.
Related Product List
- OXO Good Grips Chef's Precision Digital Instant Read Thermometer
- 8 Tray Electric Food Dehydrator with Digital Timer
- COSORI 6 Tray Food Dehydrator for Jerky
- 10-inch Heavy Duty Manual Meat Slicer
- Stainless Steel Manual Frozen Meat Slicer
- BESWOOD 10" Electric Meat and Cheese Slicer
- 200W Electric Meat Slicer Machine
- 200W Electric Meat Slicer with Removable Blade
- BESWOOD 10" Premium Electric Food Slicer 240W
- Cutluxe 10" Ham Knife Serrano Prosciutto Slicer